Verify a user using SMS PIN with the Java SDK
This guide shows how to verify a user in a Java application using the Verification API and Java SDK to make and then report an SMS PIN verification.
The following diagram demonstrates the flow that happens to verify a user:
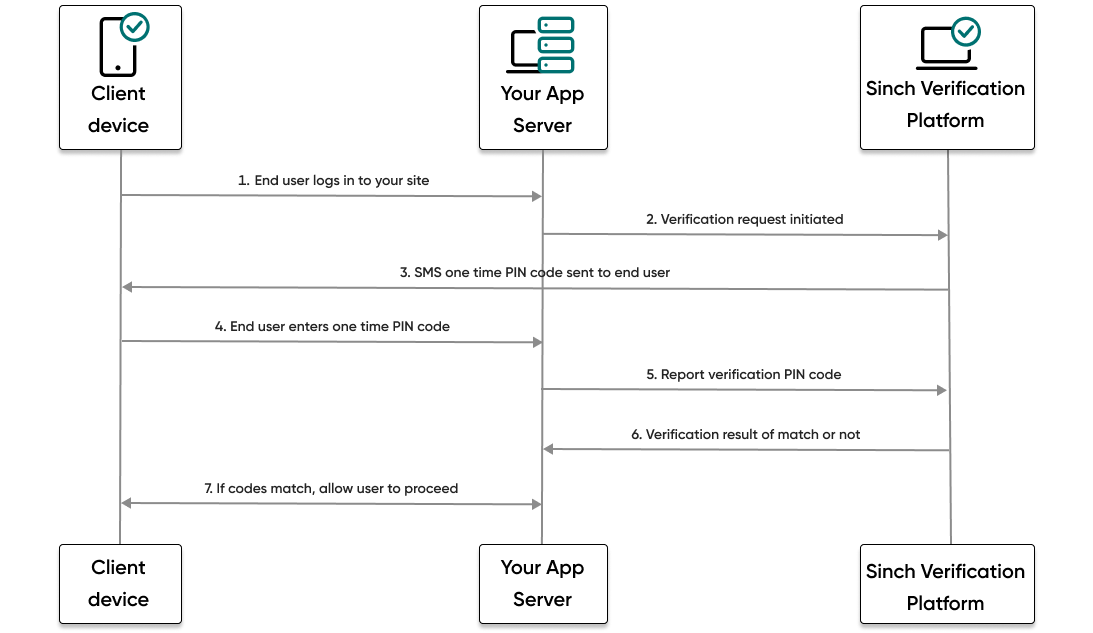
- The end user visits your website or service and tries to log in.
- Your backend then makes a request to the Sinch platform and initiates an SMS PIN verification request.
- The Sinch platform sends an SMS message with a one time PIN code to the phone number of the user.
- The user enters the code they received.
- Your backend makes a report verification request using the code the user entered.
- If the code matches, your backend will receive a success result from Sinch.
- The user, now verified, can proceed to log in to your site or service.
In this guide you will learn:
- Set up your Java application
- How to initiate an SMS PIN verification request
- How to report an SMS PIN verification code
Note:
Before you can get started, you need the following already set up:
- All Numbers API prerequisite steps.
- JDK 8 or later and a familiarity with how to create a new Java application.
- Gradle and a familiarity with how use the Gradle build tools.
Set up your Java application
- Create a new folder where you want to store your application. Open a command prompt or terminal to that location and execute the following command:
gradle initThis command starts up the process to create a new blank Java application. You can select the default options for most of the prompts, but ensure you select that you want to create an application.
Note:
This guide assumes you're using Gradle but if you want to use another Java build tool, we've provided installation instructions for the most popular ones below.
- Open
App.javain your favorite editor and copy/paste in the App.java sample found on this page. Remember to keep your ownpackage com.
Now that you've set up your application file, you must install the SDK itself and populate the code sample with your corresponding information.
The easiest way to install the SDK is using the Maven central repository.
Installing the SDK
You can create your Java project using your favorite method. Once your project is created, you need to add the SDK as a dependency. Depending on if you are using Gradle or Maven, you can add the necessary dependencies in the following ways:
Gradle
Add or ensure the following is in the application'sbuild.gradle file:...
repositories {
...
mavenCentral()
...
}
...
dependencies {
...
implementation 'com.sinch.sdk:sinch-sdk-java:+'
...
}
......
repositories {
...
mavenLocal()
...
}
...
dependencies {
...
implementation("com.sinch.sdk:sinch-sdk-java:+")
...
}
...Maven
Add the following to thepom.xml file:<dependency>
<groupId>com.sinch.sdk</groupId>
<artifactId>sinch-sdk-java</artifactId>
<version>LATEST</version>
</dependency>Important!
build.gradle file, you need to connect the Gradle standard input to the Java Standard.in. You can do that by placing the following line of code in the application plugin section:application {
...
run{
standardInput = System.in
}
}Modify your application
The code provided in App.java includes placeholder parameters. You'll need to update the parameters detailed in the following subsections with your values.
Initialize the client
To start using the SDK, you need to initialize the main client class and create a configuration object to connect to your Sinch account and Verification app. You can find all of the credentials you need on your Sinch dashboard.
import com.sinch.sdk.SinchClient;
import com.sinch.sdk.models.Configuration;

public class App {

    public static void main(String[] args) {
        SinchClient client = new SinchClient(Configuration.builder()
                                    .setApplicationKey("YOUR_application_key")
                                    .setApplicationSecret("YOUR_application_secret")
                                    .build());
    }
}
Note:
For testing purposes on your local environment it's fine to use hardcoded values, but before deploying to production we strongly recommend using environment variables to store the credentials.
Save the file.
Initiate your verification request
- Now you can execute the code and initiate your verification request. Run the following command:
gradle run - Follow the prompts in the console and enter the phone number of the mobile handset to which you want to send the SMS PIN verification request.
You should receive a text message to your mobile handset with a verification code. In a production scenario, this is the code that a user would enter into your app to verify their account.
Troubleshooting tip
If after running your app you receive a 5000 error response, you may have forgotten to save your file after adding your authentication values. This is an easy mistake to make! Try saving the file and running the app again.
You should also see the JSON response in the console.
Report your SMS PIN code
Now that you've received the SMS PIN code to your mobile handset, it's time to report that code to the Sinch servers to complete the verification process.
- In the console, follow the prompts by entering the code you received on your mobile handset.
- If you entered the code that you received, you should see a success report response in your console.
- Enter
Qin the console to quit the application or try sending a code to your mobile handset again and reporting an incorrect code to see what happens!

