Telnyx Simple IVR Demo
⏱ 60 minutes build time || Github Repo
Telnyx Simple IVR demo built on Call Control and node.javascript.
In this tutorial, you’ll learn how to:
- Set up your development environment to use Telnyx Call Control using Node.
- Build a simple IVR based on Telnyx Call Control using Node.
- Prerequisites
- Telnyx Call Control Basics
- Building the Voice IVR
- Lightning-Up the Application
- Get the Complete Application
Prerequisites
Before you get started, you’ll need to set up a Mission Control Portal account, buy a number and connect that number to a Connection. You can learn how to do that in the [Quickstart guide] .
You’ll also need to have node installed to continue. You can check this by running the following:
$ node -vNote: After pasting the above content, Kindly check and remove any new line added
If Node isn’t installed, follow the official installation instructions for your operating system to install it.
You’ll need to have the following Node dependencies installed for the Call Control API:
require('express');
require('superagent');
Note: After pasting the above content, Kindly check and remove any new line added
Telnyx Call Control Basics
For the Call Control application, we'll use a set of basic functions to perform Telnyx Call Control Commands. This tutorial will be using the following subset of Telnyx Call Control Commands:
- [Call Control Transfer]
- [Call Control Answer]
- [Call Control Speak]
- [Call Control Gather Using Speak]
- [Call Control Hangup]
You can get the full set of available Telnyx Call Control Commands [here] .
For each Telnyx Call Control Command we will be creating a function that will execute an HTTP POST request back to Telnyx. To execute this API we are using request, so make sure you have it installed. If not you can install it with the following command:
$ npm install superagent --saveAfter that, you’ll be able to use superagent as part of your app code as follows:
const superagent = require('superagent');Note: After pasting the above content, Kindly check and remove any new line added
To make use of the Telnyx Call Control Command API you’ll need to generate a Telnyx API Key and Secret.
To do this, go to the Mission Control Portal and under the Auth tab, select Auth V1.
Once you have them, you can include it as a ‘const’ variable in your code:
const g_telnyx_key = 'dfb642e0-558d-47b1-b9da-7b84cdcf0c9a';
const g_telnyx_secret = '6ow9hnixSPirLvgwWPbcda';
Note: After pasting the above content, Kindly check and remove any new line added
Once all dependencies are set, we can create a function for each Telnyx Call Control Command. All Commands will follow the same syntax:
function call_control_COMMAND_NAME(f_call_control_id, f_INPUT1, ...){
  const cc_action = ‘COMMAND_NAME’;

  const request = superagent
    .auth(g_telnyx_key, g_telnyx_secret)
    .post(`https://api.telnyx.com/calls/${f_call_control_id}/actions/${cc_action}`)
    .send({ PARAM1: f_INPUT1 });

  request
    .then((response) => {
      const body = response.body;
    })
    .catch((error) => {
      console.log(error);
    });
}
Note: After pasting the above content, Kindly check and remove any new line added
Understanding the Command Syntax
There are several aspects of this function that deserve some attention:
-
Function Input Parameters: to execute every Telnyx Call Control Command you’ll need to feed your function with the following:-
the
Call Control ID - the input parameters, specific to the body of the Command you’re executing.
-
the
Having these set as function input parameters will make it generic enough to reuse for different use cases:
function call_control_COMMAND_NAME(f_call_control_id, f_INPUT)Note: After pasting the above content, Kindly check and remove any new line added
All Telnyx Call Control Commands will be expecting the Call Control ID except Dial. There you’ll get a new one for the leg generated as response.
-
Name of the Call Control Command: as detailed [here] , the Command name is part of the API URL. In our code we call that theactionname, and will feed the POST Request URL later:
const cc_action = ‘COMMAND_NAME’;Note: After pasting the above content, Kindly check and remove any new line added
-
Building the Telnyx Call Control Command: once you have the Command name defined, you should have all the necessary info to build the complete Telnyx Call Control Command:
const request = superagent
  .auth(g_telnyx_key, g_telnyx_secret)
  .post(
    `https://api.telnyx.com/calls/${f_call_control_id}/actions/${cc_action}`
  )
  .send({ PARAM1: f_INPUT1 });
Note: After pasting the above content, Kindly check and remove any new line added
In this example, you can see that Call Control ID and the Action name will feed the URL of the API, both Telnyx Key and Telnyx Secret feed the Authentication headers, and the body will be formed with all of the different input parameters received for that specific Command.
-
Calling the Telnyx Call Control Command: Having the requestheadersandoptions/bodyset, the only thing left is to execute thePOST Requestto run the command. For that we are making use of node'srequestmodule:
request
  .then((response) => {
    const body = response.body;
  })
  .catch((error) => {
    console.log(error);
  });
Note: After pasting the above content, Kindly check and remove any new line added
Telnyx Call Control Commands
This is how every Telnyx Call Control Command used in this application would looks:
Call Control Transfer
function call_control_transfer(f_call_control_id, f_dest, f_orig) {
  const cc_action = 'transfer';

  const request = superagent
    .auth(g_telnyx_key, g_telnyx_secret)
    .post(
      `https://api.telnyx.com/calls/${f_call_control_id}/actions/${cc_action}`
    )
    .send({
      to: f_dest,
      from: f_orig,
    });

  request
    .then((response) => {
      const body = response.body;
    })
    .catch((error) => {
      console.log(error);
    });
}
Note: After pasting the above content, Kindly check and remove any new line added
Call Control Answer
function call_control_answer_call(f_call_control_id, f_client_state_s) {
  const l_cc_action = 'answer';
  const l_client_state_64 = null;

  if (f_client_state_s) {
    l_client_state_64 = Buffer.from(f_client_state_s).toString('base64');
  }

  const request = superagent
    .auth(f_telnyx_api_key_v1, f_telnyx_api_secret_v1)
    .post(
      `https://api.telnyx.com/calls/${f_call_control_id}/actions/${cc_action}`
    )
    .send({ client_state: l_client_state_64 }); // if inbound call === null

  request
    .then((response) => {
      const body = response.body;
    })
    .catch((error) => {
      console.log(error);
    });
}
Note: After pasting the above content, Kindly check and remove any new line added
Call Control Speak
function call_control_speak(f_call_control_id, f_tts_text) {
  const cc_action = 'speak';

  const request = superagent
    .auth(f_telnyx_api_key_v1, f_telnyx_api_secret_v1)
    .post(
      `https://api.telnyx.com/calls/${f_call_control_id}/actions/${cc_action}`
    )
    .send({
      payload: f_tts_text,
      voice: g_ivr_voice,
      language: g_ivr_language,
    });

  request
    .then((response) => {
      const body = response.body;
    })
    .catch((error) => {
      console.log(error);
    });
}
Note: After pasting the above content, Kindly check and remove any new line added
Call Control Gather Using Speak
function call_control_gather_using_speak(
  f_call_control_id,
  f_tts_text,
  f_gather_digits,
  f_gather_max,
  f_client_state_s
) {
  const cc_action = 'gather_using_speak';
  const l_client_state_64 = null;

  if (f_client_state_s) {
    l_client_state_64 = Buffer.from(f_client_state_s).toString('base64');
  }

  const request = superagent
    .auth(f_telnyx_api_key_v1, f_telnyx_api_secret_v1)
    .post(
      `https://api.telnyx.com/calls/${f_call_control_id}/actions/${cc_action}`
    )
    .send({
      payload: f_tts_text,
      voice: g_ivr_voice,
      language: g_ivr_language,
      valid_digits: f_gather_digits,
      max: f_gather_max,
      client_state: l_client_state_64,
    });

  request
    .then((response) => {
      const body = response.body;
    })
    .catch((error) => {
      console.log(error);
    });
}
Note: After pasting the above content, Kindly check and remove any new line added
Call Control Hangup
function call_control_hangup(f_call_control_id) {
  const cc_action = 'hangup';

  const request = superagent
    .auth(f_telnyx_api_key_v1, f_telnyx_api_secret_v1)
    .post(
      `https://api.telnyx.com/calls/${f_call_control_id}/actions/${cc_action}`
    )
    .send({});

  request
    .then((response) => {
      const body = response.body;
    })
    .catch((error) => {
      console.log(error);
    });
}
Note: After pasting the above content, Kindly check and remove any new line added
Client State: within some of the Telnyx Call Control Commands list we presented, you probably noticed we were including the Client State parameter. Client State is the key to ensure that we can have several levels on our IVR while consuming the same Call Control Events.
Because Call Control is stateless and async, your application will be receiving several events of the same type, e.g. user just included DTMF. With Client State you enforce a unique ID to be sent back to Telnyx which will be used within a particular Command flow, identifying it as being at Level 2 of a certain IVR for example.
Building the Voice IVR
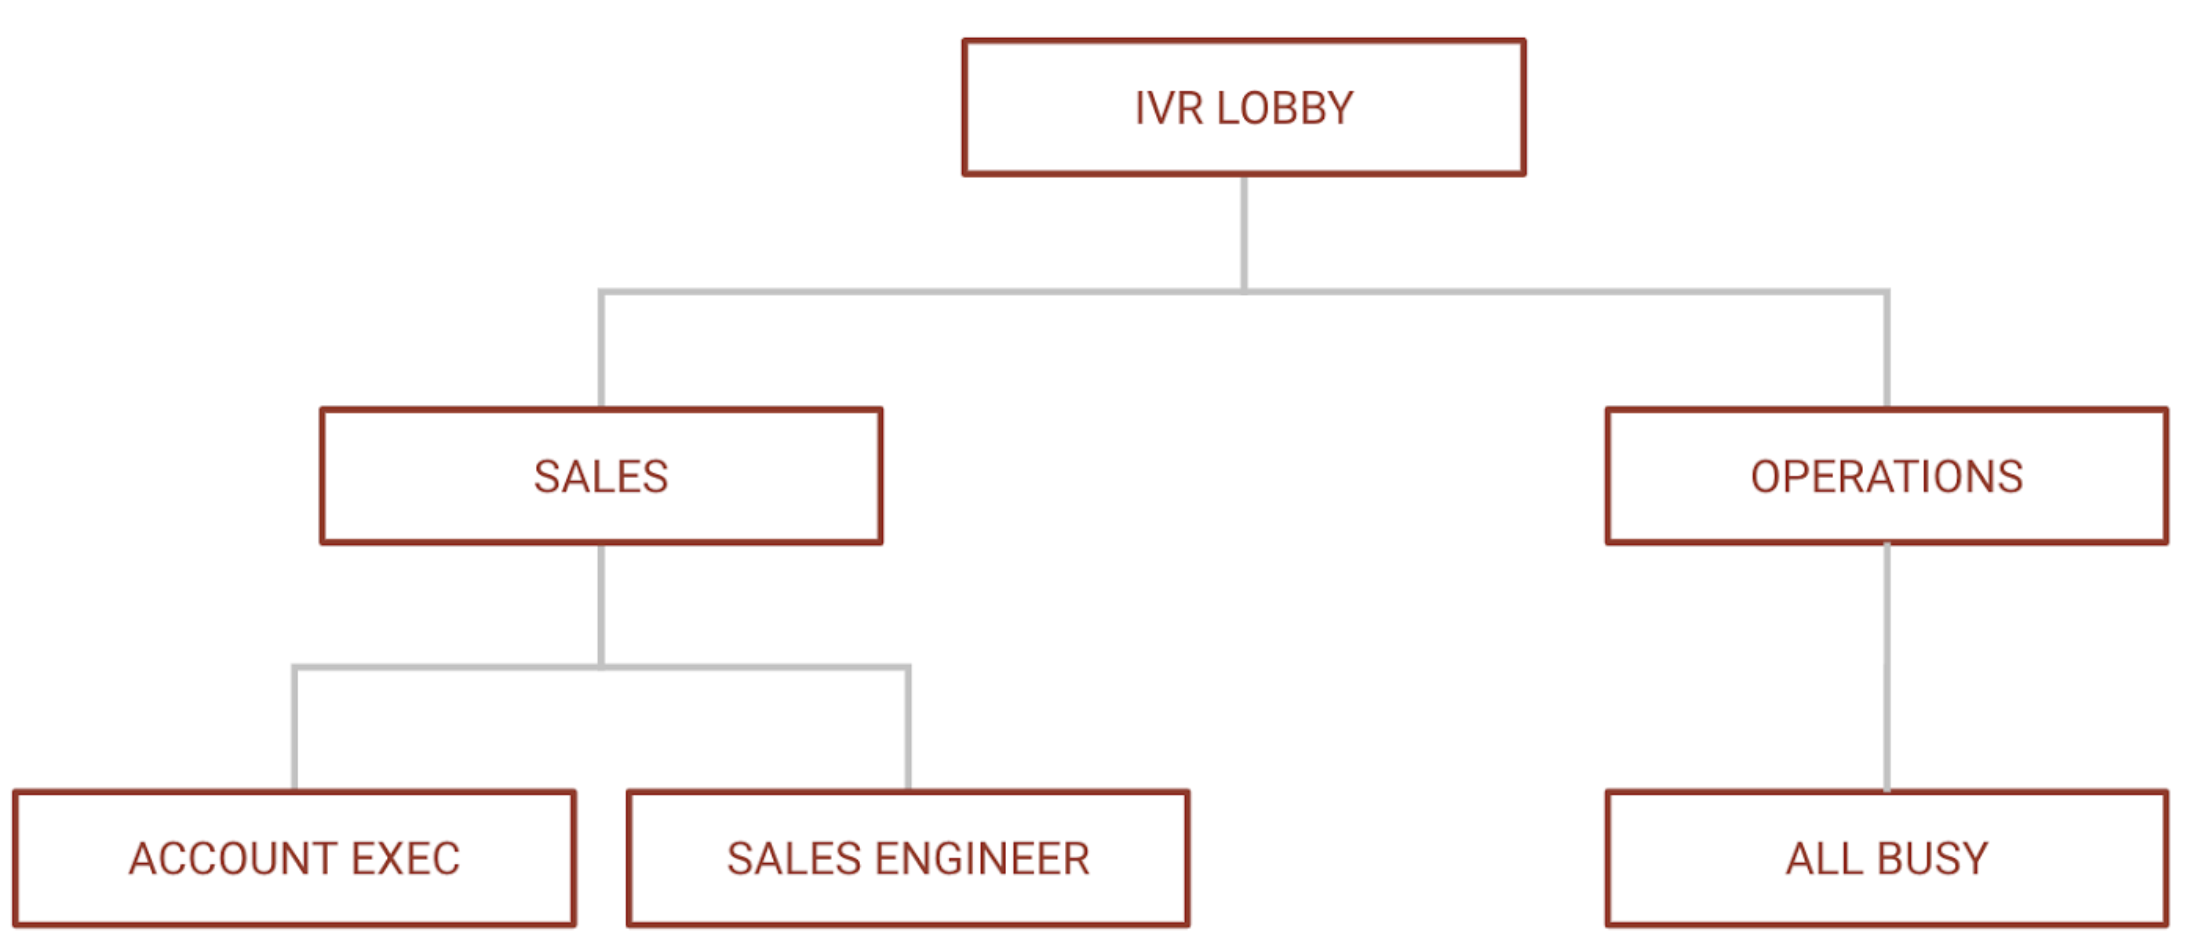
With all the basic Telnyx Call Control Commands set, we are ready to consume them and put them in the order that will create the IVR. For this tutorial we want to keep it simple with a flow that corresponds to the following IVR Logic:
- handle an incoming call
- greet and use text-to-speech to indicate all options
- digest DTMS to navigate the user through the voice menus and redirect the call to an agent
To exemplify this process we created a simple API call that will be exposed as the webhook in Mission Portal. For that we would be using express:
$ npm install superagent --saveNote: After pasting the above content, Kindly check and remove any new line added
With express we can create an API wrapper that uses HTTP GET to call our Request Token method:
rest.post('/'+g_appName+'/ivr-test, function (req, res) {
  // IVR CODE GOES HERE
})
Note: After pasting the above content, Kindly check and remove any new line added
This would expose a webhook like the following:
http://MY_DOMAIN_URL/telnyx-ivr/ivr-test
You probably noticed g_appName in the previous point. That is part of a set of global variables we are defining with info we know we are going to use in this app: TTS parameters, like voice and language to be used, IVR redirecting contact points, etc...
You can set these at the beginning of your code:
// Application:
const g_appName = 'demo-telnyx-ivr';

// TTS Options
const g_ivr_voice = 'female';
const g_ivr_language = 'en-US';

// IVR Redirect Options
const g_account_exec = '+12345678910';
const g_sales_eng = '+10987654320';
Note: After pasting the above content, Kindly check and remove any new line added
If you would like to run the application on your local machine you will have to expose the app to the public internet. To do this you can use
ngrok. You can follow the setup guide forngrok[here] .
With that set, we can fill in that space that we named as IVR CODE GOES HERE. When your webhook URL is ready you can add the webhook URL to your Mission Control Portal Connection associated with your number. Here's an example of what a Call Control setup looks like:
![Mission Control Portal Call Control setup]
So the first thing to be done is to identify the kind of event you just received and extract the Call Control Id and Client State:
if (req && req.body && req.body.event_type) {
  var l_hook_event_type = req.body.event_type;
  var l_call_control_id = req.body.payload.call_control_id;
  var l_client_state_64 = req.body.payload.client_state;
} else {
  res.end('0');
}
Note: After pasting the above content, Kindly check and remove any new line added
Once you identify the Event Type received, it’s just a matter of having your application react to that. It's the way you react to an Event that helps you in creating the IVR logic. We will execute Telnyx Call Control Commands as a reaction to Events.
Webhook Call Initiated >> Command Answer Call
if (l_hook_event_type == 'call_initiated') {
  if (req.body.payload.direction == 'incoming')
    call_control_answer_call(l_call_control_id, null);
  else call_control_answer_call(l_call_control_id, 'stage-outgoing');
  res.end();
}
Note: After pasting the above content, Kindly check and remove any new line added
Webhook Call Answered >> Command Gather Using Speak
Once your app is notified by Telnyx that the call was established you want to initiate your IVR. You do that using the Telnyx Call Control Command Gather Using Speak, with the IVR Lobby message.
As part of the Gather Using Speak Command we indicate that valid digits for the DTMF collection are 1 and 2, and that only 1 digit input would be valid. Since this is Lobby level, client_state will be null at this point.
else if (l_hook_event_type=='call_answered'){
  if (!l_client_state_64)
    // No State >> Incoming >> Gather Input
    call_control_gather_using_speak(l_call_control_id,
        'Welcome to this Telnyx IVR Demo,'
      + 'To contact sales please press 1,'
      + 'To contact operations, please press 2.'
      + '12', '1', null);
  res.end();
}
Note: After pasting the above content, Kindly check and remove any new line added
Please note that if a client_state different than null would be received with the Call Answered Webhook, this would be an event coming from another leg and nothing would be done then. We will get into that later.
Webhook Speak Ended >> Do Nothing
Your app will be informed that the Speak executed ended at some point. For the IVR we are doing nothing with that info, but we will need to reply to that command.
else if (l_hook_event_type =='speak_ended'){
  res.end();
}
Note: After pasting the above content, Kindly check and remove any new line added
For consistency, the Telnyx Call Control engine requires every single Webhook to be replied to by the Webhook end-point, otherwise we will keep trying to send it. For that reason, we have to be ready to consume every Webhook we expect to receive and reply with 200 OK.
Webhook Call Bridged >> Do Nothing
Your app will be informed that the call was bridged at some point. For the IVR we are doing nothing with that info, but we will need to reply to that command.
else if (l_hook_event_type == call_bridged){
  res.end();
}
Note: After pasting the above content, Kindly check and remove any new line added
Webhook Gather Ended >> IVR Logic
When you receive the Webhook informing your application that Call Control Gather Ended (DTMF input) we can create the redirection and forking logic:
else if (l_hook_event_type =='gather_ended'){
  // Receive DTMF Option
  var l_ivr_option = req.body.payload.digits;


  // Check Current IVR Level

  if (!l_client_state_64){ // IVR Lobby

    if (l_ivr_option == '1'){ // Sales

      // Speak Text
      call_control_gather_using_speak(l_call_control_id,
          'You reached the sales support channel,'
        + 'To contact an Account Executive please press 1,'
        + 'To contact a Sales Engineer, please press 2,'
        +  '12','1','stage-sales');

    } else if (l_ivr_option == '2'){  // Operations

      // Speak Text
      call_control_speak(l_call_control_id,
          'You reached the operations support channel,'
        + 'no operations staff is available at the moment,'
        + 'please try again later');

  } else {  // Beyond Lobby Level

    // Set Client State
    var l_client_state_buff =
      new Buffer(l_client_state_64, 'base64');
    var l_client_state_s =
      l_client_state_buff.toString('ascii');

    // Selected Sales >> Choose Destination
    if (l_client_state_s == "stage-sales"){

      // Select Destination

      if (l_ivr_option == '1'){
        // Dial AE
        call_control_transfer(l_call_control_id,
          g_sip_agent, req.body.payload.from);

      } else if (l_ivr_option == '2'){
        // Dial Sales Engineer
        call_control_transfer(l_call_control_id,
          g_sales_eng, req.body.payload.from);
      }

    }

  }
  res.end();
}
Note: After pasting the above content, Kindly check and remove any new line added
The first thing we are doing here is collecting the digits received. After that, we look at the client_state value of the Webhook received: if null the DTMF input received was coming from the IVR Lobby; otherwise it is coming from more advanced levels (in this example that would be just a second level).
Client State is Null > IVR Lobby
If Webhook comes from the IVR Lobby there are two possible scenarios: the user selected 1 (Sales); or the user selected 2 (Operations).
If they selected Sales, then we use another Call Control Gather Using Speak to check whether he wants to contact an Account Executive or a Sales Engineer. If they selected Operations, we simulate an out of service logic by executing a Call Control Speak Command saying that no one is available.
Client State is Not Null > Sales
If the client state is not null it means that a Control Gather Ended webhook is related to the second level of our IVR, i.e. the previous Call Control Gather Using Speak for Sales that we just described.
In this case, we will look at the DTMF input the user provided and use the Call Control Transfer Command to transfer the call to: an Account Executive in the case DTMF provided was 1; or to a Sales Engineer in the case the DTMF provided was 2.
Lightning-Up the Application
Finally the last piece of the puzzle is having your application listening for Telnyx Webhooks:
var server = rest.listen(8081, function () {
  var host = server.address().address;
  var port = server.address().port;
});
Note: After pasting the above content, Kindly check and remove any new line added
And start the application by executing the following command:
$ node demo-ivr-node.jsNote: After pasting the above content, Kindly check and remove any new line added
Get the Complete Application
If you enjoyed this tutorial and would like to grab all this code as a whole, be sure to visit our public GitHub page.